1- Disclaimer
RhinoCentre Training Approach
This training module is part of a systematic series of training modules for the marine industry developed by RhinoCentre.About the author
 Gerard Petersen is naval architect, founder of RhinoCentre and uses Rhino since 2001 in his projects in the most integrated way. Petersen developed hull design and fairing skills to be able to develop innovative concepts with unique hull shapes like the integrated trimaran Kenau. The trimaran project proved that Rhino is a professional tool to turn an idea into reality. More and more, Petersen became convinced that Rhino is the perfect tool to model any vessel hull whether it is a ship, boat or yacht. The next step was to bring his developed knowledge and experience to a training. This way, anyone can profit from Rhino being a hull design and fairing tool. As Petersen offers Rhino training since 2005, he also has to experience how to transfer knowledge in a comprehensible way.
Training Videos of the exercises
- The videos in this module are already made in Rhino 6 as it will be released early in 2018. As you will see, the look and feel of Rhino 6 is similar to Rhino 5. What will catch your eye mostly is that Rhino shows the control points of curves when you select them.
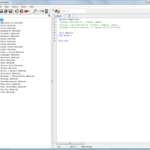
- The training videos are made at a resolution of 1920x1080 pixels.
- The videos often zoom in and out to focus on the action of typing a command, turning on/off a layer etc. This is also done for those who watch these videos on a smaller screen like a tablet for example.
- The videos also often contain annotations that display the current action. For example arrows point out to look at another location than the position of the mouse pointer at that specific moment. Also often the use of specific keys on the keyboard are indicated. This might probably seem a bit stupid or unnecessary but this is also done for people who are deaf, have other hearing problems or find it difficult to understand the English pronunciation.
- We would like to hear your comments on the videos to be able to improve them.
About RhinoCentre
Since 2003 RhinoCentre shares and increases Rhino knowledge in offering training, consultancy and other services to the marine industry worldwide. The best example is the joined development of the Rapid Hull Modeling Methodology with people of several companies and organizations. On the other hand is RhinoCentre in close contact with McNeel & Associates, the developers of Rhino as well as plugin developers to make Rhino even better. RhinoCentre maintains with most of their customers a long lasting relationships based on trust and equality. Please contact us if you need any help regarding Rhino related issues.About the value of this training
We have invested more than a decade of experience in this training. To develop a training module like this one takes us at least three months. You and your company paid for this in time and money. Please keep this in mind in case you’re considering giving this training (or the associated training files) away, or even worse, publishing it on internet. There is no way we can prevent this with protections. Actually we don’t even want to try. We simply trust you on this.
|
3- Before you start
To make sure the steps done in this manual are working as expected some standard settings are needed. [video width="1280" height="720" mp4="https://www.rhinocentre.nl/wp-content/uploads/2017/10/Ex-01-Preparations.mp4"][/video]Exercise 1:[caption id="attachment_8667" align="alignnone" width="700"]
- Make sure 'Grid Snap' is turned off and 'Ortho', 'Osnap' and 'Planar' is turned on in the status bar (Fig.2)
Fig.2: Osnap toolbar & Status bar[/caption] [caption id="attachment_8662" align="alignright" width="412"]
Fig.3: Layer manager panel[/caption]
- Make sure that the Osnap toolbar is visible (Fig.2). If it’s not go to 'Tools' > 'Object Snap' > and check 'Persistent Osnap Dialog'
- In the Osnap toolbar (Fig.2), turn on the following object snaps: 'End', 'Near', 'Point', 'Mid', 'Cen', 'Int'
- Make sure the Layer manager panel is visible (Fig.3). If it’s not, then run the _Layer command
- Download now the necessary training files: M1R2 - Training Files - Online
- Make sure to store the files in a secure place on your hard drive.
- Now copy the training files folder to the desktop. This makes it most easy to access the necessary files during the training.
- At last, create a new folder on your desktop and name it "WIP" (Work In Progress). In this folder you can save your training files thus keeping the original files clean.
Rhino viewport orientation
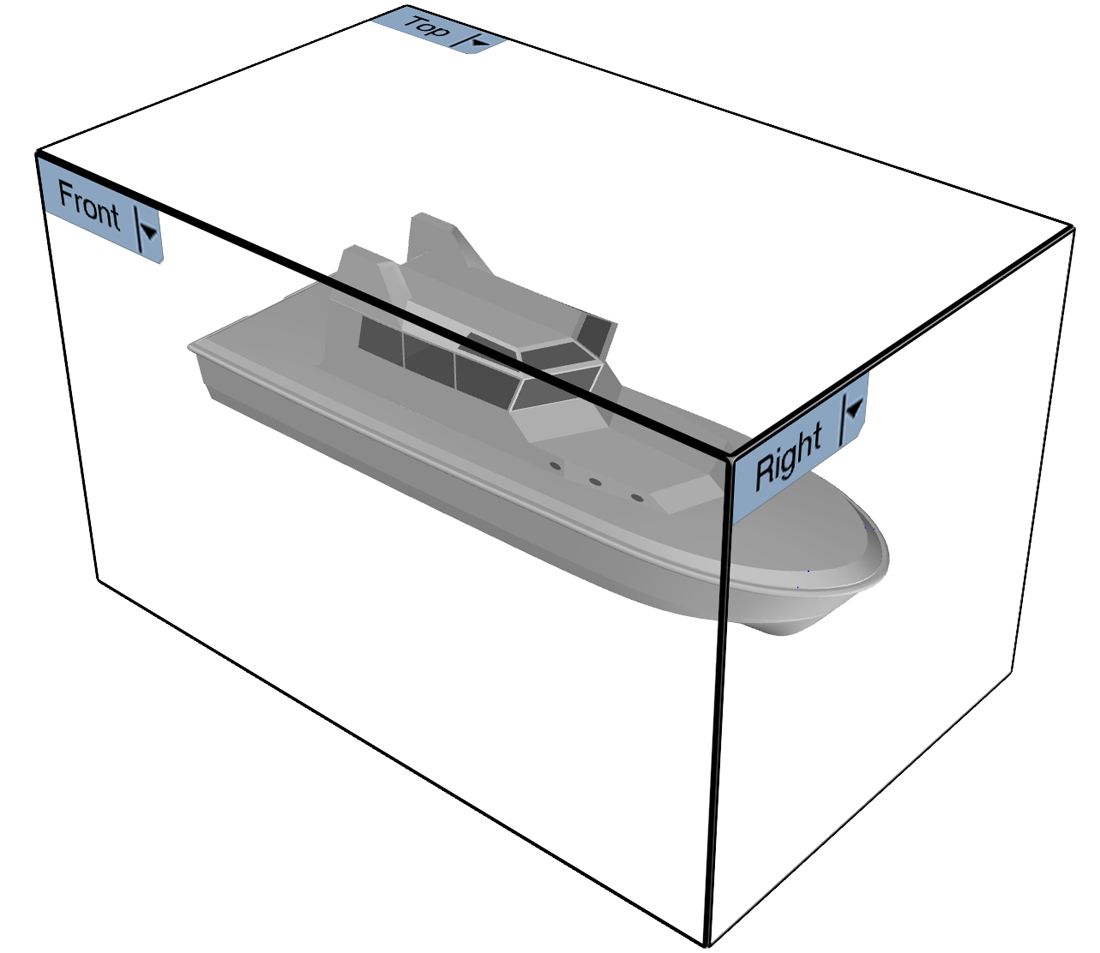 At this point one word about Rhino viewport orientation in Rhino. In naval architecture, the hull center line orientation is along the X-axis which is unfortunately inconsistent with the Rhino viewport setup because:
- The side view of the hull is called 'Front' in Rhino.
- The front view is called 'Right' in Rhino.
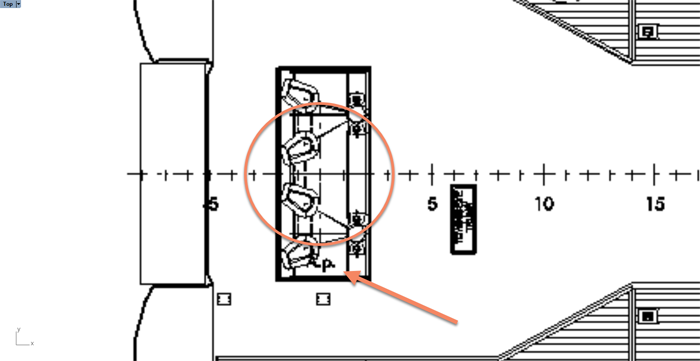 Fig. 3: 'Aft Perpendicular' of the Main deck[/caption]
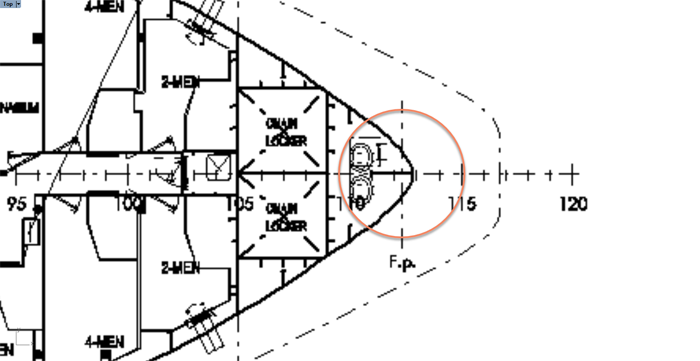 Fig. 4: 'Fore Perpendicular' of the Main deck[/caption]
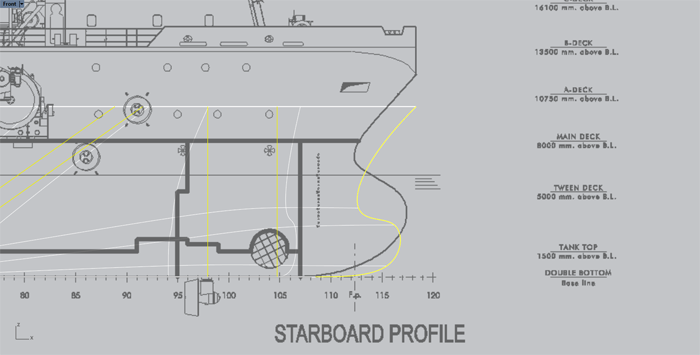 Fig. 5: Scale to the correct length[/caption]
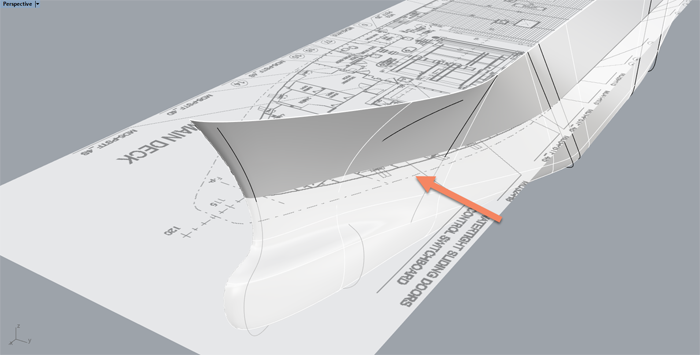 Fig. 6: The bow is too slender[/caption]
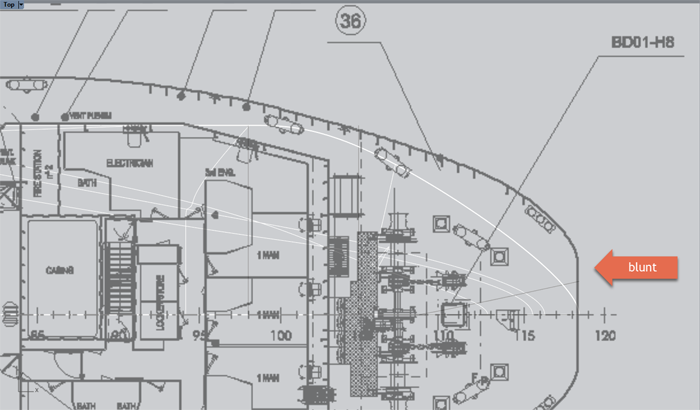 Fig. 7: The upper part of the stem is blunt[/caption]
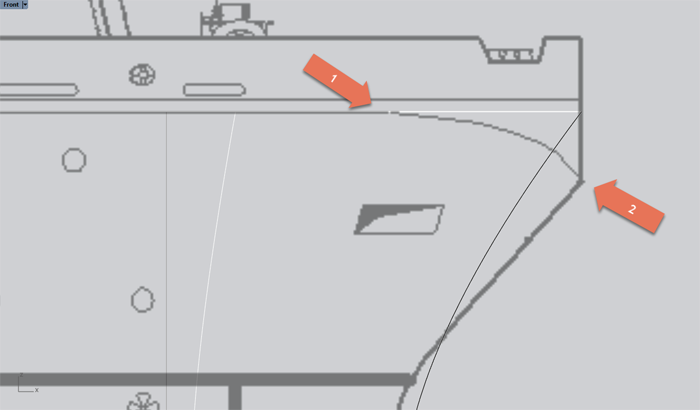 Fig. 8: Sheer strake knuckle declines[/caption]
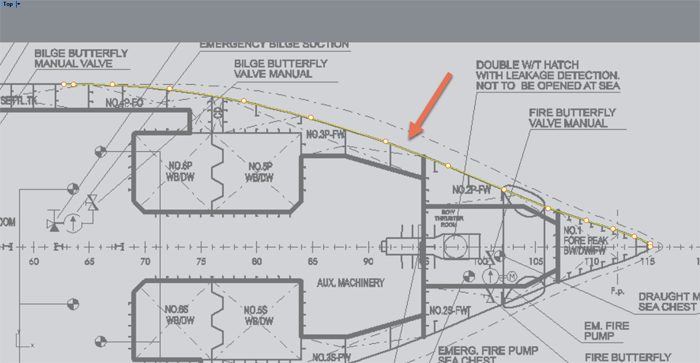 Fig. 9: Trace the port side hull contour[/caption]
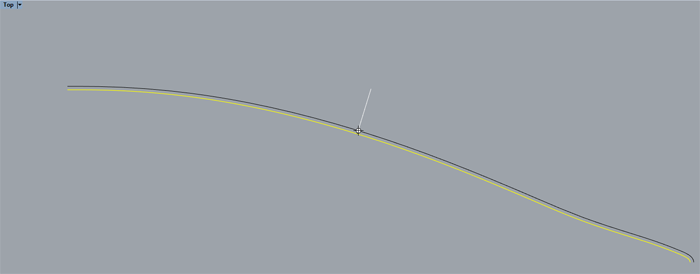 Fig. 10: Click outside the hull in the "Top" viewport[/caption]
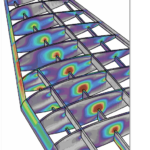
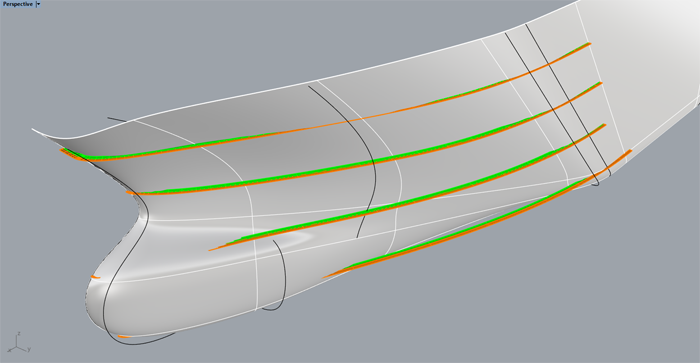 Fig. 11: Deviation of the loft surface to the ref-ribs[/caption]
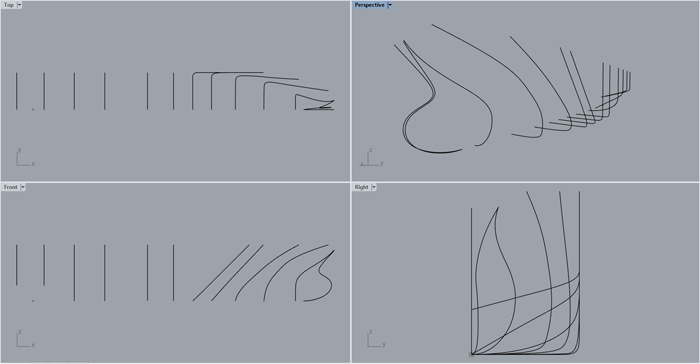 Do the individual loft curves show smooth in all viewports? Use also command _CurvatureGraph. When there is much tension in the loft curves, this will also be the case in the loft surface. The challenge is to create relaxed loft curves resulting in relaxed surfaces.
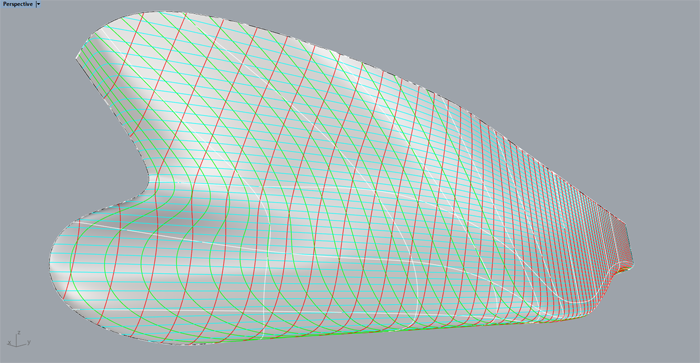
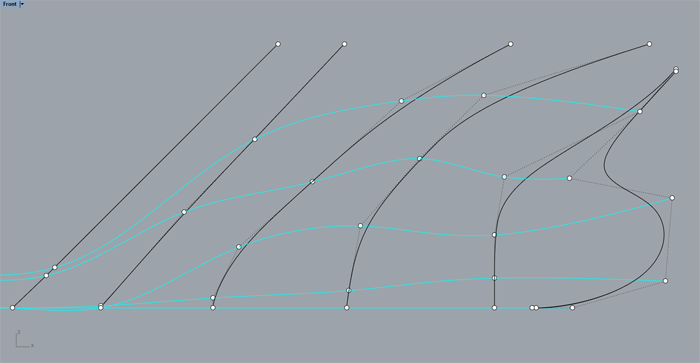 Is there a gradual distribution of the control points compared to other loft curves? The cyan color curves in the image show that the control points are not well distributed.
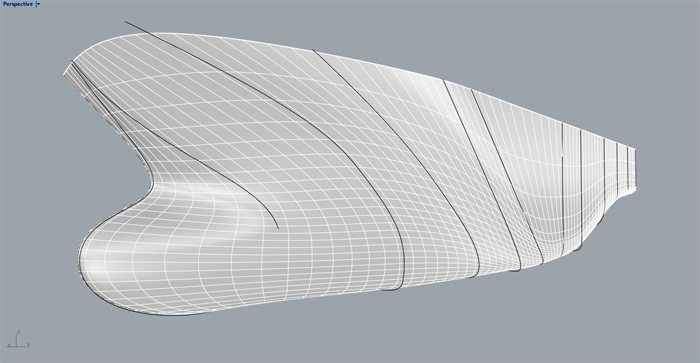 Increase the amount of ‘isocurves’ to have a better idea of the ‘flow’ of the surface.
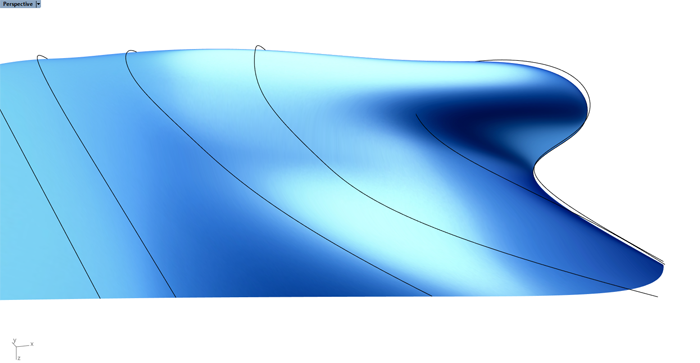 Take an overall look at the surface with the Glossy for Fairing display mode.
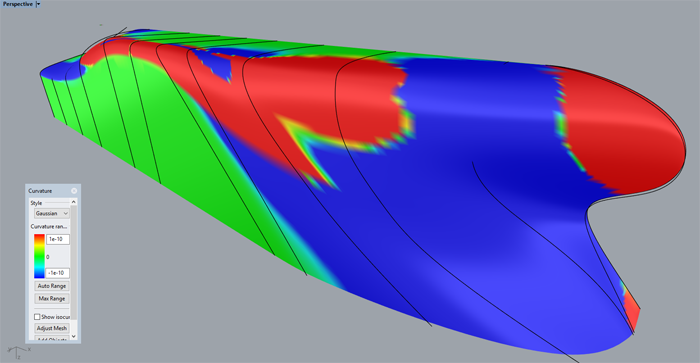 A Gaussian curvature graph shows the bumps and hollows in the surface
 Finally, make a linesplan to check how Stations, Buttocks and Waterlines look like.
 If nothing works, just solve it like this clever guy.[/caption]
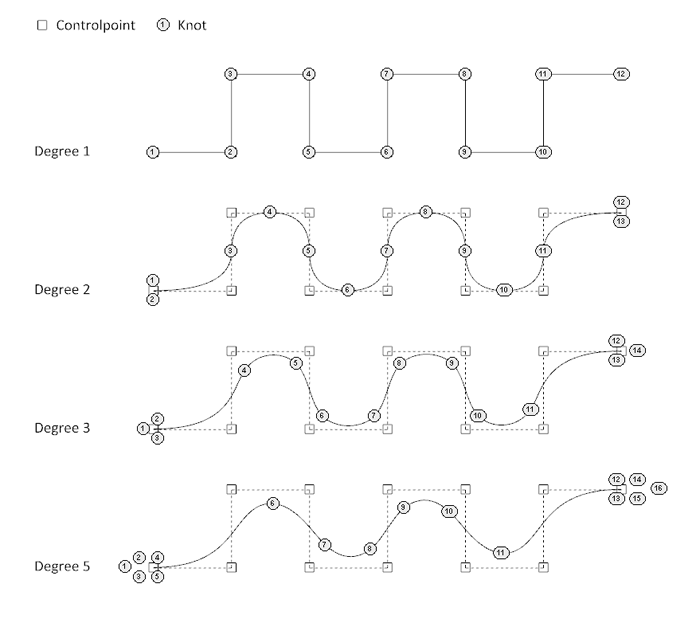 Fig. 14: Degree and Knots[/caption]
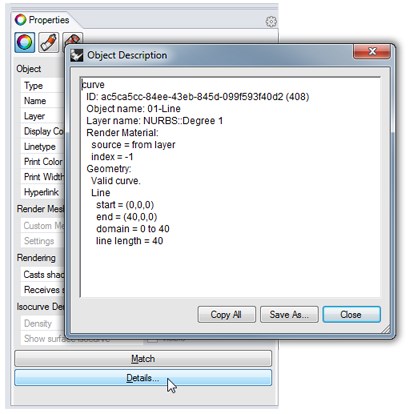 Fig. 15: Object Description dialog[/caption]
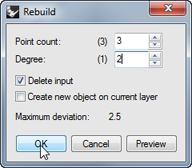 Fig. 16: Rebuild the L-shaped curve[/caption]
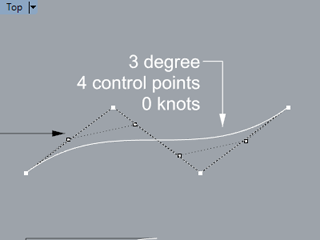 Fig. 17: Different control point positions[/caption]
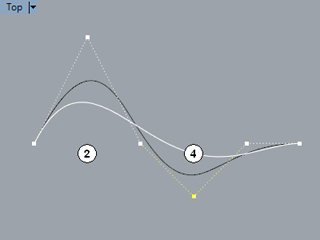 Fig. 18: A Degree 5 curve is 'more relaxed' than a Degree 3 curve[/caption]
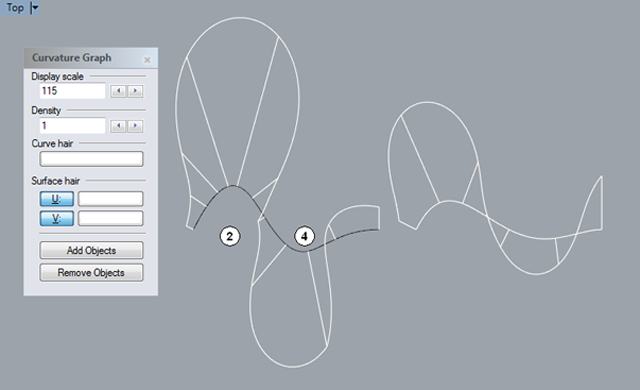 Fig. 19: Curvature difference of 3 and 5 degree curves[/caption]
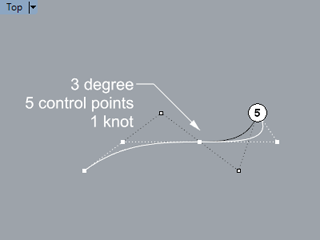 Fig. 20: Notice the difference in the shapes[/caption]
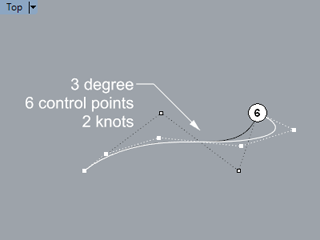 Fig. 21: Notice the difference in the shapes[/caption]
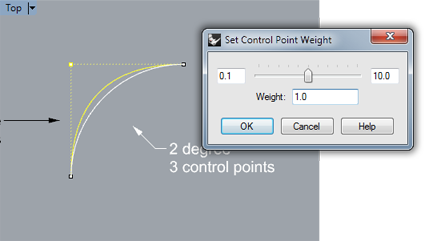 Fig. 22: Edit Control Point Weight[/caption]
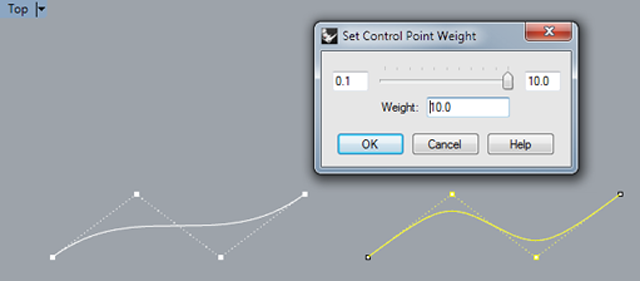 Fig. 23: Same degree and point count but different shape[/caption]
 Fig. 25: Control point display of a single, kinked hull surface[/caption]
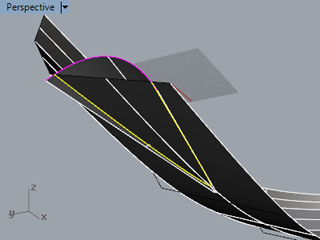 Fig. 26: Use Intersect to check if the tunnel cuts the hull[/caption]
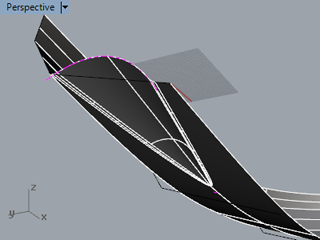 Fig. 27: The resulting soft chine[/caption]
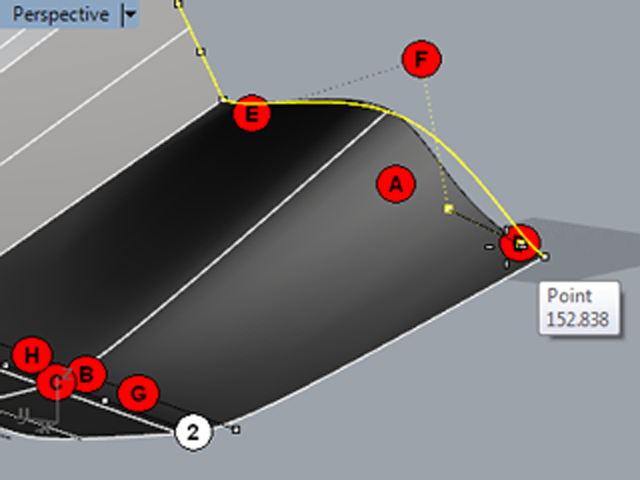 Fig. 28: Move the adjacent control points to (D) and (E)[/caption]
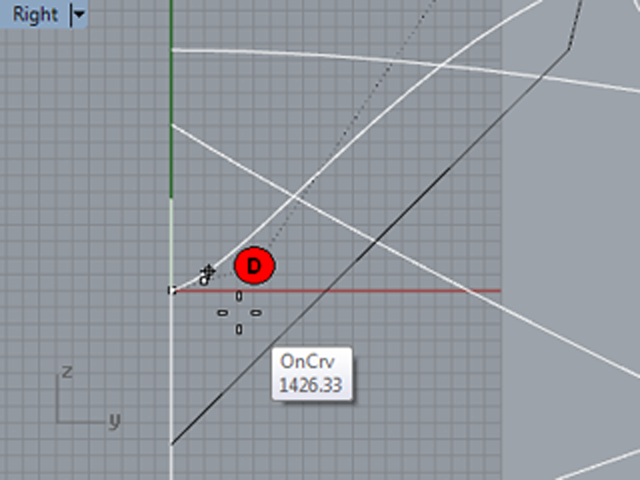 Fig. 29: Add one extra control point to the left of (D)[/caption]
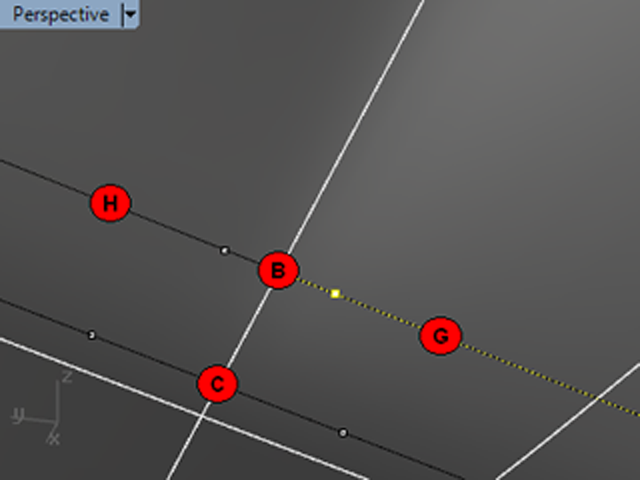 Fig. 30: Move the control points at (G) and (H) very close to (B)[/caption]
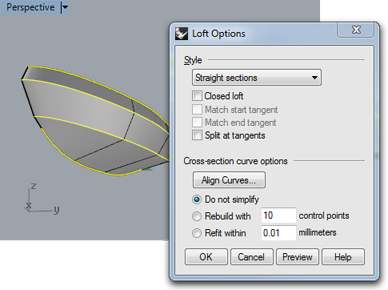 Fig. 31: Loft with longitudinal curves[/caption]
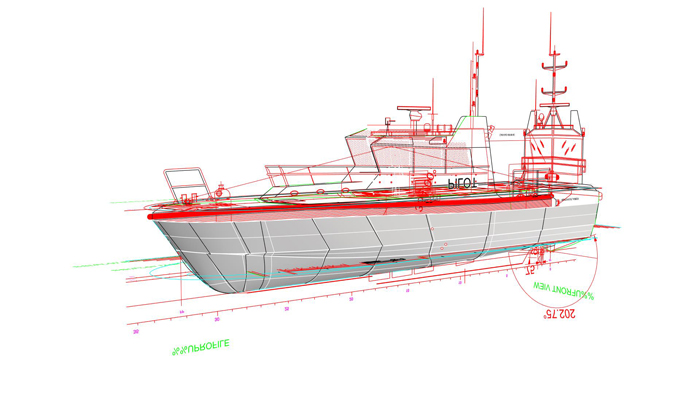
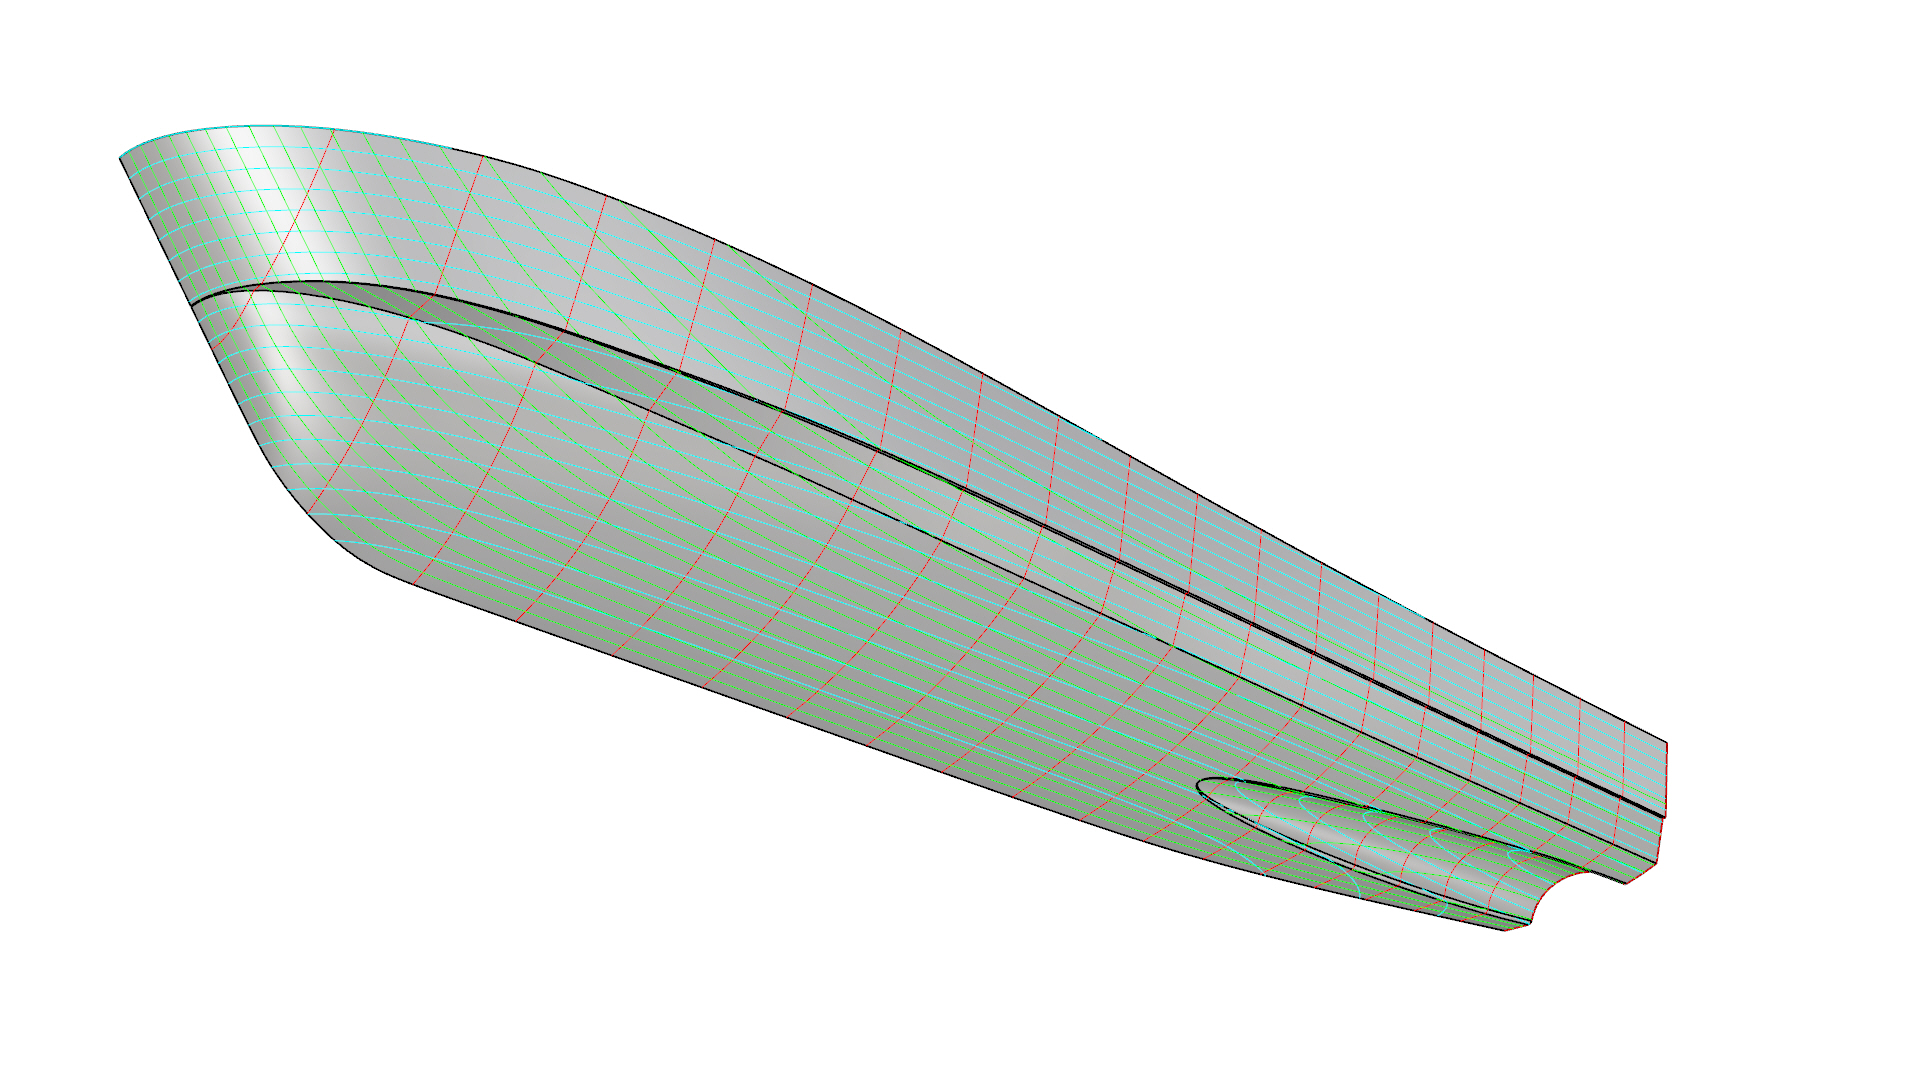
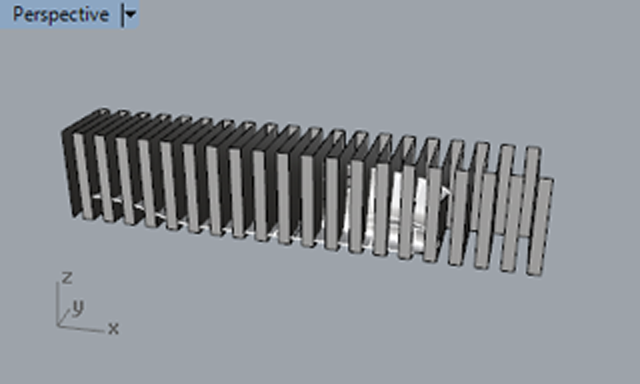 Fig. 32: The stations reference object[/caption]
 Fig. 33: The deviation values reported in the command prompt.[/caption]
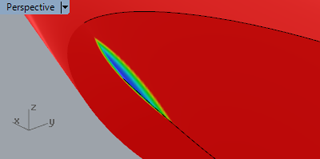 Fig. 34: The problem-area at the forefoot[/caption]
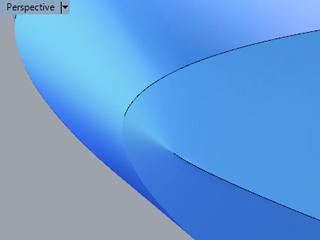 Fig. 35: The fixed forefoot[/caption]
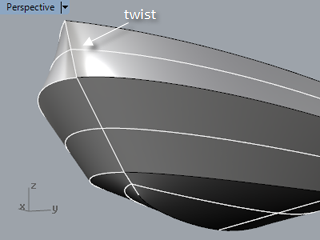 Fig. 36: Locate areas with significant twist[/caption]
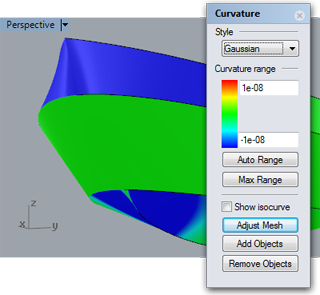 Fig. 37: CurvatureAnalysis[/caption]
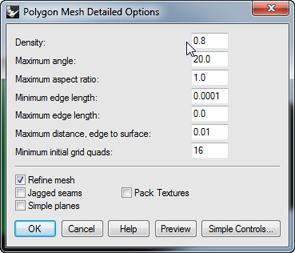 Fig. 38: Curvature analysis mesh settings[/caption]
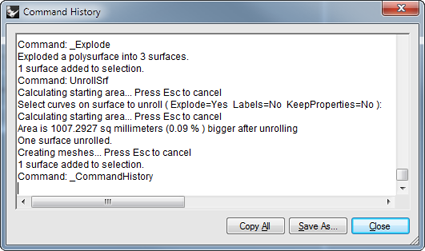 Fig. 39: Unroll area difference in the command history[/caption]
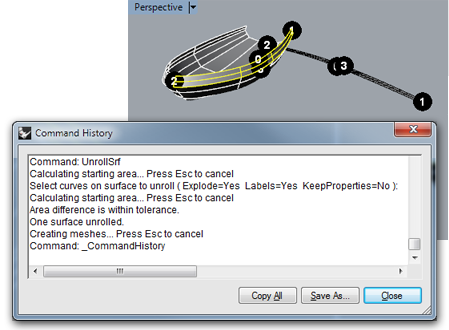 Fig. 40: Area difference is within tolerance[/caption]
 Fig. 41: Contour curve and labels of the unrolled surface[/caption]
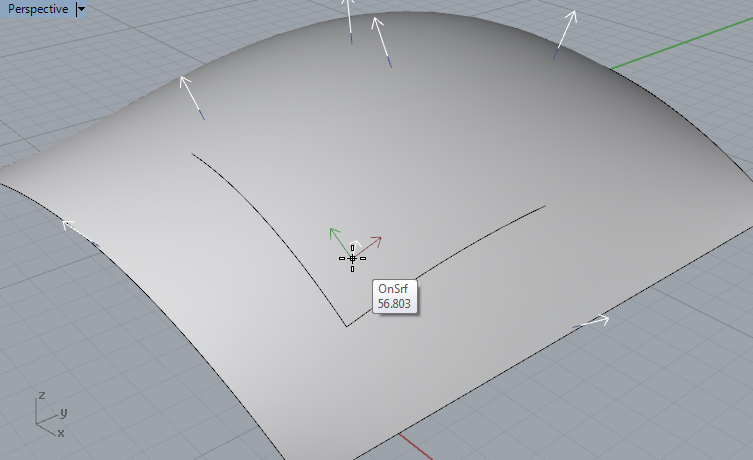 A lot of autodidact Rhino users don’t realize that each curve and surface has a direction. Curves have a direction from start to endpoint and surfaces have a 'U', 'V' and 'normal' direction. The U- and V direction are local X and Y orientations. The normal direction of a surface is perpendicular to the surface.
Having control on direction might be important when exporting a hull surface to other software like NUPAS or other engineering software. The Orca3d naval architecture plugin also demands a proper surface normal direction for correct calculations. When a fully enclosed polysurface is modeled in Rhino the surface normal automatically point outwards and cannot be flipped.
Regarding U- and V direction; basically any surface in Rhino comes from a rectangular shape like a piece of paper. By transforming this rectangle Rhino can generate nearly any shape you can think of. Think of U- and V direction as the horizontal and vertical directions of a piece of paper in front of you.
Exercise 27: Curve and Surface Direction
[video width="1920" height="1080" mp4="https://www.rhinocentre.nl/wp-content/uploads/2017/11/M1R2-Ex.-27.mp4"][/video]
A lot of autodidact Rhino users don’t realize that each curve and surface has a direction. Curves have a direction from start to endpoint and surfaces have a 'U', 'V' and 'normal' direction. The U- and V direction are local X and Y orientations. The normal direction of a surface is perpendicular to the surface.
Having control on direction might be important when exporting a hull surface to other software like NUPAS or other engineering software. The Orca3d naval architecture plugin also demands a proper surface normal direction for correct calculations. When a fully enclosed polysurface is modeled in Rhino the surface normal automatically point outwards and cannot be flipped.
Regarding U- and V direction; basically any surface in Rhino comes from a rectangular shape like a piece of paper. By transforming this rectangle Rhino can generate nearly any shape you can think of. Think of U- and V direction as the horizontal and vertical directions of a piece of paper in front of you.
Exercise 27: Curve and Surface Direction
[video width="1920" height="1080" mp4="https://www.rhinocentre.nl/wp-content/uploads/2017/11/M1R2-Ex.-27.mp4"][/video]
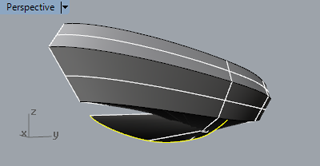 Fig. 42: The hull surface is destroyed and twisted[/caption]
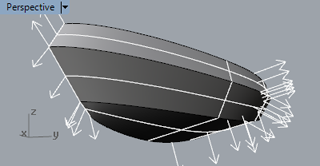 Fig. 43: All loft curves have the same direction[/caption]
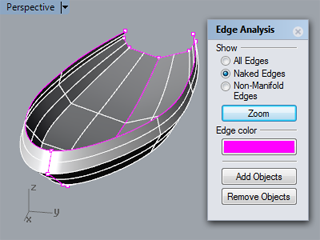 Fig. 44: The 'Edge Analysis' dialog[/caption]