
This trainig module is sold without support. When desired, please click here and purchase support separately.
Rapid Hull Modeling for: Ships / Yachts / Workboats / Multihulls
Preliminary Design – Sales Impressions – Fairing – Surface Quality Analysis – Hydrostatics – Lines Plans – Kick Start Example hulls
Introduction
Rhino can be applied for a lot of tasks when hull shapes are involved:
Initial Design/ Sales Impressions/ Hull Optimization/ Final Design/ Fairing for Production/ Reverse Engineering: Hull from GA, Lines-Plan, point cloud or measurements.
Every type of ship hull can be designed and modeled accurate and fair in Rhino with several techniques and strategies. Each strategy has its pros and cons depending on the type of ship hull and purpose of the 3d model of the ship hull. Most important factors are whether the strategy allows fast editing and easy fairing for a flexible workflow and accurate results. The Rapid Hull Modeling Methodology offers it all, for nearly every type of ship and yacht hull shape, which makes it so attractive and valuable. The Rapid Hull Modeling Methodology was originally developed by Bas Goris and Phil Shapiro more than 10 years ago. Since then it is further developed by RhinoCentre.
Keep in mind
- Most important is that the user defines the quality of the surfaces and not Rhino. Therefore proper training is crucial to avoid mistakes.
- Most challenging in Rhino is to create hulls as a single surface instead of surface patch-work. The reason for this is that it is easier to fair a single surface hull. Also editing the shape later is much more convenient with a single surface hull
- Some types of ship hulls are impossible to model as a single surface in Rhino. One example is a ship hull with an aft bulb when a lot of control is desired for accurate reverse engineering of the aft bulb. Another example is modeling a twin-skeg arrangement as a single surface. In that case the T-Splines Rhino plugin is the next solution
- Both double curved round bilge type of hulls as single curved (developable, multi chine) type of hulls can be modeled in Rhino.
Goals of the training
- Create a ship hull from scratch or modify an existing example of a ship hull
- Generate loft curves which define the shape of the surface of the ship hull
- Edit loft curves for:
- Creating the desired ship hull type
- Fairing of the ship hull
- Generate a lines plan with sections, waterlines and buttocks
- Analyze the shape and characteristics of the hull
- Regarding smoothness
- With Rhino Hydrostatics
Testimonial
“I have been a Rhino user for about fifteen years and I considered myself a competent modeler. However, I learned more about Rhino in four days at Rhinocentre than I did in fifteen years of teaching myself. I highly recommend this course.”Winston Pynn
Instructor, Naval Architecture
Marine Institute of Memorial University, Canada
Training Content
- How to learn Rhino
- Rhino viewport orientation
- Setup a Custom Display
- Rapid Hull Modeling Methodology
- Design a merchant ship hull from scratch
- Creating the basic loft
- About History
- Model Management
- Modeling the bow
- A tangent stem
- Shaping the bulbous bow
- Flat of side editing
- Aft body modeling
- Analyze and control planar areas like the flat of side
- Analyze developable surfaces vs. double curved surfaces
- Scale a hull to other principal dimensions
- Control the bilge radius
- Analyze control points of loft curves compared to resulting loft surface
- Hydrostatic analysis: Volume Displacement / Center of Buoyancy / Wetted Surface Area / Waterline Length /Maximum Waterline Beam / Water Plane Area / Center of Floatation
- Model a transom
- Considerations and understanding
- About Loft command styles
- Fairing techniques
- Multiple ways of selecting objects in Rhino
- Moving control points to edit and fair loft curves
- Using Gumball editor
- Nudge control point positions
- Aligning Control Points
- Curvature Graph analysis and using it for fairing
- Control continuity from one surface to another surface (G0-G4).
- Reference curves (deck line, keel)
- Reference objects (cargo hold, propeller clearance etc.)
- Adding and Deleting Control Points
- Smooth display with proper display Mesh
- Intersections for shape analysis and lines drawings. Section curves can also be input for modeling frames and other stiffeners.
- Lines Plan
- Investigate hull examples of 6 ships, 4 yachts and 3 workboats. These hulls can also be used to kick-start your projects.
- Accuracy based on proper ‘Units’ and ‘Tolerance’ settings
- This is a pure Rhino 5, Rhino 6 or Rhino 7 software training. Plugins are not required.
- Training duration: 8 hours.
- Mandatory prerequisites for this training: R1L1 – Rhino Level 1 training.
- After purchasing this module, it will be accessible and available for twelve months.
- It is possible to save the texts and images of the training module as a reference book. The instructional movies will not be available anymore when the access period ends.
- By purchasing this product, one person is allowed to follow this training. This means that, for example, a colleague should also purchase this training. We trust you in this and ask you to respect our efforts and investment in developing this training for you.
Down below, you can see a small part of the online training to give you an idea what you can expect.
First, every exercise is explained with a movie. After that, below the movie, the exercise is written out step by step so you can practice yourself. You also receive tips, cautions and notes to understand better what you do and learn more than is explained in the exercises.
Display Mesh
Surfaces in Rhino are described with NURBS mathematics. However graphics cards can only show the NURBS surfaces in wireframe display. To show the surfaces in shaded or rendered display Rhino generates automatically a so called ‘render mesh’ for each surface with a default smoothness. This explains that sometimes the edge curves of a surface show smooth and accurate but the surface itself shows rough and ugly. Especially during fairing with the Glossy for Fairing display it is important to have a smooth render mesh.
Exercise 32: Display Mesh
Exercise 32: Display Mesh
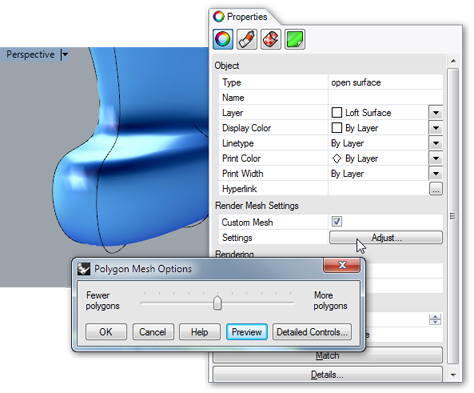
Fig. 62: Custom Mesh & Simple Mesh Options dialog
- Switch the Perspective viewport display to ‘Glossy for Fairing’
- Select the loft surface
- Zoom in at the bow area
- In the Object Properties menu select the checkbox for a Custom Mesh (Fig. 62).
- Click Adjust. The ‘Polygon Mesh Options’ dialog pops up (Fig. 62)
- Click at Preview and look at the mesh faces on the surface
- Move the slider to ‘Fewer polygons’ and click at ‘Preview’ again. Notice the large mesh faces along the surface and the straight lines at deck level. This doesn’t look smooth
- Move the slider to ‘More Polygons’ and click ‘Preview’ again. This looks much better. However the bulbous bow is still very rough
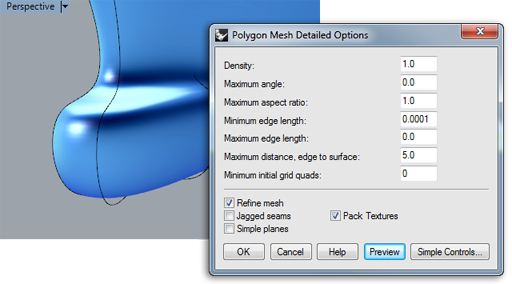
Fig. 63: Detailed Mesh Options dialog
- Click ‘Detailed Controls’ in the Simple Mesh Options dialog and set the values according to Fig. 63
- Click Preview again. The mesh faces distribution is much more refined now.
- Press OK to accept these settings and examine the display quality of the surface.
It is important to understand that the more refined the Display Mesh is, the larger the file size will become as each Mesh face has to be described. Furthermore editing the shape of the hull is slower with a detailed render mesh as it has to be recomputed over and over again. On the other hand a sufficient level of detail of a render mesh is necessary to be able to examine the surface smoothness. Finding the proper balance here is very important.