
This training module is sold without support. When desired, please click here and purchase support separately.
AutoCAD DWG input • Working with PDF • Using images
Introduction
Let’s face it… even today AutoCAD DWG is the “de facto” industrial standard to exchange design information in 2D. So knowing how to deal with DWG in a smart way is essential for each designer or engineer. Although it is easy to open a DWG drawing in Rhino, it is most challenging to keep a Rhino file clean and avoid dozens of layers, blocks and other information from the AutoCAD drawing that doesn’t contribute to the 3d model.
It is tempting to grab a few curves from an AutoCAD drawing and use them as input for a 3d model. But from what drawing and revision number where they used? That is an important question at a later time when questions are raised or it turns out that discrepancies occur. The workflow taught in this training also secures that it is clear where the input came from.
Besides 2D AutoCAD information it often occurs that an image is used as background reference for modeling 3d objects. Images might be a scanned lines plan or a picture from internet that was found with Google images for example. This training teaches a workflow for preparing and using images in an accurate and efficient way.
Goal of the training: Learn the necessary steps to use DWG, PDF and images in Rhino accurate, clean and clear.
Training Content
- How to learn Rhino
- AutoCAD DWG input
- Opening DWG in Rhino
- Cleaning up the DWG (See the online training example down below)
- Taming DWG layers
- A block for each view
- Positioning the views in 3D space
- Saving the file
- Working with PDF
- Opening vector PDF in Rhino
- Cleaning up PDF import
- Scale to real size
- Finish the preparation like the AutoCAD exercise
- Raster PDF
- Using images
- Inserting a ‘pictureframe’
- Creating views
- Layer-management and positioning the views
- Final steps
- Put it in use
- Worksessions
- Set up a worksession
- Saving a worksession
- Using curves from an attached block
Testimonial
“I have been a Rhino user for about fifteen years and I considered myself a competent modeler. However, I learned more about Rhino in four days at Rhinocentre than I did in fifteen years of teaching myself. I highly recommend this course.”Winston Pynn
Instructor, Naval Architecture
Marine Institute of Memorial University, Canada
- This is a pure Rhino 5, Rhino 6 or Rhino 7 software training. Plugins are not required.
- Training duration: 4 hours.
- Mandatory prerequisites for this training: R1L1 – Rhino Level 1 training.
- After purchasing this module, it will be accessible and available for twelve months.
- It is possible to save the texts and images of the training module as a reference book. The instructional movies will not be available anymore when the access period ends.
- By purchasing this product, one person is allowed to follow this training. This means that, for example, a colleague should also purchase this training. We trust you in this and ask you to respect our efforts and investment in developing this training for you.
Down below, you can see a small part of the online training to give you an idea what you can expect.
First, every exercise is explained with a movie. After that, below the movie, the exercise is written out step by step so you can practice yourself. You also receive tips, cautions and notes to understand better what you do and learn more than is explained in the exercises.
Cleaning up the DWG
Most AutoCAD drawings contain numerous blocks. These should be exploded to facilitate working with the geometry later. Furthermore AutoCAD files often contain up to several hundreds of duplicates which should be deleted to reduce the file size. Also note that curves can have the same color as the grey Rhino background or be yellow which makes it impossible to see if the curves are selected as the default selection color of Rhino is yellow. All this needs to be fixed.
Exercise 2: Cleaning up DWG input
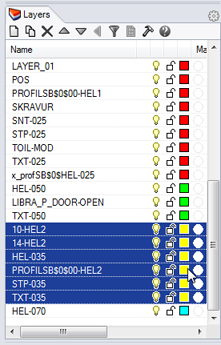
Fig.6: Select yellow layers
- Open “pilot-vessel.dwg” using one of the methods described above
- Run _SelBlockInstance to select all blocks
- Explode the selected blocks with the command _ExplodeBlock (Rhino should report: “91 blocks exploded”).
- Press [Esc] to deselect everything
- Run _SelDup to select all duplicates (Rhino should report: “Found 1303 duplicates. 4 points, 1287 curves, 12 text added to selection”). Hit [Delete] to delete them
- Run _Purge with all options enabled to delete all empty layers, blocks, etc.
- Run _SelColor command, click at a yellow curve and hit [Enter] (Rhino should report: “329 curves, 20 text added to selection.”)
- Now change the Display Color of the yellow curves in the Properties panel to “By Layer”
- Sort the layer list in the Layer manager panel by color (click the header of the “Color” column)
- Select all yellow layers (use [Shift] to select multiple layers. Fig.6)
- Change the layer color of the selected layers to black
- Sort the layer list by name (click the header of the “Name” column)
- Save the file as “pilot-vessel-GA.3dm”.
You may have noticed the _SelDupAll command. Like the _SelDup command it selects all visible objects that are geometrically identical but it’s including the original. You can use it to find objects that have been changed by comparing a before and after version of a model.